You may think that designing your own DIY electronics kit sounds like a daunting task, reserved for the experts or those with an abundance of technical knowledge. However, with a little guidance and some careful planning, you'll be surprised at how achievable it actually is.
So, if you're ready to embark on this rewarding journey of creating your very own electronics kit, keep reading to discover the step-by-step process that will help you bring your vision to life.
Key Takeaways
- Setting realistic project goals is crucial for designing a DIY electronics kit, including considering available resources, skills, and complexity.
- Researching and selecting components from reputable suppliers is important, considering factors such as quality, availability, and cost-effectiveness.
- Planning the layout of the kit should take into account the size, shape, and fragility of components, as well as providing clear labeling and organization.
- Gathering necessary tools and supplies, including a high-quality soldering iron and digital multimeter, is essential for successful DIY electronics projects.
Determine Your Project Goals
To design DIY electronics kits, it's crucial to begin by determining your project goals. Setting a realistic timeline and exploring different design options are key aspects of this process.
When setting a timeline for your project, it's important to consider your available resources, skills, and the complexity of the kit you want to create. Be realistic about the time it will take to gather the necessary components, design the circuit, and assemble the kit. Rushing the process may result in a subpar product, while giving yourself too much time may lead to unnecessary delays.
Exploring different design options allows you to consider various features and functionalities for your kit. Start by researching existing kits on the market to get inspiration and understand what's already available. Then, brainstorm ideas and sketch out different circuit designs. Consider factors such as the intended audience, complexity level, and potential applications.
Research and Select Components
Begin the process of designing DIY electronics kits by conducting thorough research and carefully selecting the components you'll need. This step is crucial to ensure that your kit meets your project goals and functions properly. Here are three important aspects to consider during this stage:
- Component sourcing: Look for reputable suppliers that offer a wide range of electronic components. Consider factors such as quality, availability, and customer reviews. Some popular online platforms for component sourcing include Digi-Key, Mouser Electronics, and Adafruit. Take note of any special requirements or limitations for certain components, such as compatibility with specific microcontrollers or voltage ratings.
- Cost analysis: Calculate the total cost of all the components you plan to include in your DIY kit. Consider factors such as the quantity needed, shipping costs, and any additional tools or accessories required. Compare prices from different suppliers to find the most cost-effective options without compromising on quality. It's also a good idea to factor in any potential future upgrades or modifications that may be necessary.
- Compatibility and versatility: Ensure that the selected components are compatible with each other and can be used for a variety of projects. This will allow users to explore different applications and experiment with their creativity. Consider including components that are commonly used in electronics projects, such as resistors, capacitors, LEDs, and sensors.
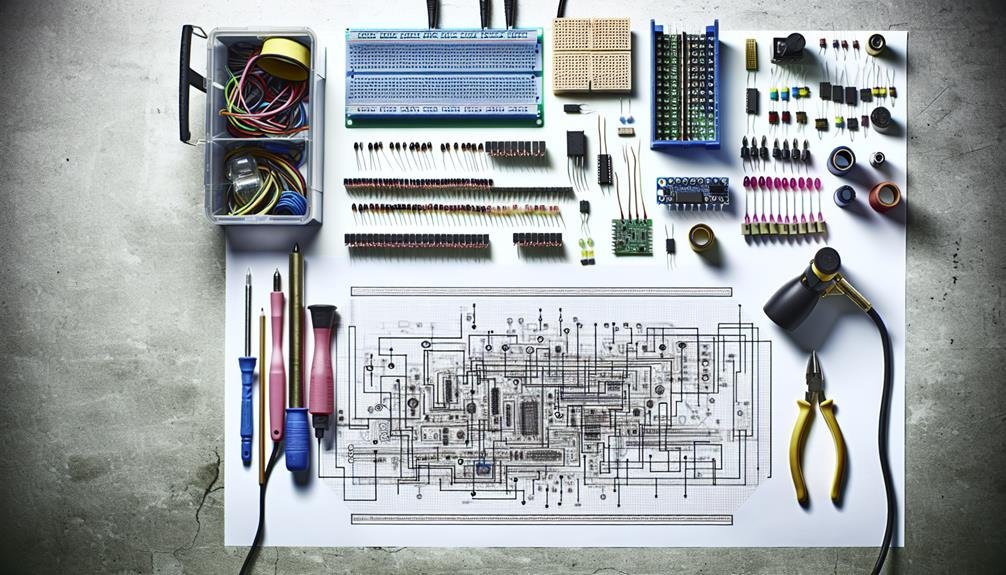
Plan Your Kit Layout
Now that you have thoroughly researched and selected the components for your DIY electronics kit, it's time to strategically plan the layout of your kit. Kit organization and component selection are crucial aspects that can greatly enhance the user experience.
When planning the layout, consider the size, shape, and fragility of the components. Group similar items together to facilitate easy access and avoid confusion. It's also important to provide clear labeling for each component to ensure quick identification.
One effective way to organize your kit is by using compartments or dividers. This helps to keep the components separate and prevents them from getting tangled or damaged. Consider using small zip-lock bags or storage containers to store smaller components such as resistors or capacitors. For larger components like circuit boards or sensors, you can use foam padding or anti-static bags to protect them from any potential damage.
Additionally, consider the order in which the components will be used or assembled. Placing them in a logical sequence will make it easier for users to navigate through the kit. For example, place the components needed for the initial stages of a project at the top of the kit, while the components needed for later stages can be placed towards the bottom.
Gather Necessary Tools and Supplies
Start by gathering all the necessary tools and supplies for your DIY electronics kit. To ensure a successful and efficient project, careful tool selection and supply sourcing are essential. Here are three items you'll need:
- Soldering iron: Invest in a high-quality soldering iron with adjustable temperature settings. This will allow you to solder components with precision and avoid damage to delicate parts. Look for a model that heats up quickly and has a comfortable grip for extended use.
- Multimeter: A multimeter is a versatile tool that measures voltage, current, and resistance in electronic circuits. This tool is crucial for troubleshooting and testing components. Opt for a digital multimeter with clear display and reliable accuracy.
- Wire cutters and strippers: These tools are necessary for cutting and stripping wires to the required length. Look for a pair of wire cutters that provide clean and precise cuts, and ensure that the wire strippers have multiple gauge options for different wire sizes.
When sourcing supplies, consider purchasing components from reputable electronics suppliers. They offer a wide range of components, ensuring you have everything you need for your kit. Additionally, be sure to stock up on solder, wires, resistors, capacitors, and other common components to have them readily available during your DIY electronics projects.
Organize and Package Your Kit
To ensure maximum efficiency and ease of use, it's crucial to carefully organize and package your DIY electronics kit. Proper organization won't only save you time but also prevent any confusion or frustration during the assembly process.
When it comes to packaging materials, consider using a sturdy and reusable container that can safely hold all the components and tools. A transparent plastic storage box with multiple compartments is a great option as it allows you to easily see and access the items you need. Additionally, using small plastic bags or containers for smaller components will help prevent them from getting lost or mixed up.
In order to keep your kit well-organized, a labeling system is essential. Label each component or tool with its name and any relevant information such as its value or function. This will help you quickly identify the items you need for a specific project and avoid any confusion. You can use pre-printed labels or simply write on adhesive labels or masking tape.
Related posts:
 How to Build a DIY Electronics Kit for Beginners
 How to Choose the Best DIY Electronics Kit for Beginners
 How to Turn Your DIY Electronics Kit Into a Functional Device
 Best Ways to Customize Your DIY Electronics Kit
 DIY Electronics Kits Vs. Pre-Built Electronics: Which Is Better?
 Best Ways to Learn Electronics Through DIY Kits