
When it comes to DIY electronics kits, you're like a detective solving a mystery. Each component is a clue, each connection a piece of evidence. But what do you do when the power supply refuses to cooperate? Or when your connections seem suspiciously loose?
Don't worry, we've got you covered. In this discussion, we'll unravel the secrets of troubleshooting common issues with DIY electronics kits, revealing the tips and tricks you need to crack the case and bring your project to life.
So grab your magnifying glass and prepare to unravel the mysteries of electronic troubleshooting.
Key Takeaways
- Properly check and ensure the functioning of the power supply source and connections.
- Thoroughly inspect and secure all electrical components to avoid loose connection issues.
- Understand circuit design and component compatibility to avoid issues related to component mismatch.
- Use effective troubleshooting techniques and testing procedures to identify and replace faulty components.
No Power Supply
If you're experiencing a lack of power supply in your DIY electronics kit, there are a few potential causes to consider.
The first thing to troubleshoot is the power source. Ensure that your power source, whether it's a battery or an AC adapter, is functioning properly. Check if the battery is charged or if the AC adapter is plugged in and delivering the correct voltage.
Next, it's important to troubleshoot the electrical connections. Make sure that all the connections are secure and properly soldered. Loose or faulty connections can lead to a lack of power supply. Inspect the wires for any breaks or damage and replace them if necessary.
Additionally, check if there are any switches or buttons that need to be turned on for the power supply to work. Sometimes, it's as simple as flipping a switch or pressing a button.
If none of these troubleshooting steps resolve the issue, it's possible that there may be a problem with the components themselves. Check if the components are properly installed and if they're compatible with your DIY electronics kit.
Loose Connections
To address the issue of loose connections in your DIY electronics kit, it's crucial to ensure that all electrical components are securely and properly connected. Loose connections can lead to unreliable performance, intermittent functionality, and even potential damage to your kit.
To prevent this, it's important to use proper soldering techniques and testing equipment.
When soldering, make sure to clean the components thoroughly to remove any dirt or grease that may hinder the solder joint. Apply the right amount of heat to the joint and use a suitable soldering iron tip to ensure a good connection. Avoid using excessive force or pressure when soldering, as this can cause damage to the components.
After soldering, it's essential to test the connections using appropriate testing equipment. A multimeter can be used to check for continuity and resistance in the circuit. By carefully examining the connections and measuring the electrical properties, you can identify any loose or faulty connections.
Component Compatibility Issues
Component compatibility issues can arise when using different electrical components that are not designed to work together. These issues can lead to malfunctioning circuits or even damage to the components themselves. To avoid such problems, it is important to understand circuit design and ensure that the components you choose are compatible with each other.
One common compatibility issue is the voltage and current requirements of the components. If the voltage or current supplied to a component exceeds its specifications, it can lead to overheating or failure. Another issue is the physical size and shape of the components. Some components may not fit properly on a circuit board or may interfere with other components if they are not compatible in terms of size or shape.
To help you identify and address component compatibility issues, here is a table that outlines some common problems and their potential solutions:
| Compatibility Issue | Potential Solution |
|---|---|
| Voltage mismatch | Use voltage regulators or resistors to match the voltages |
| Current overload | Add current-limiting resistors or use components with higher current ratings |
| Physical interference | Rearrange components or choose alternative components that fit properly |
Faulty Components
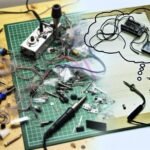
When troubleshooting DIY electronics kits, it's important to be aware of the possibility of faulty components. Faulty components can cause a range of issues, from intermittent failures to complete system malfunctions. To identify and resolve these problems, you need to apply effective troubleshooting techniques and testing procedures.
The first step in troubleshooting faulty components is to inspect them visually. Look for any signs of physical damage, such as burnt or swollen components, loose connections, or broken wires. If you find any, replace the faulty components with new ones.
Next, you can use a multimeter to test the functionality of the components. Set the multimeter to the appropriate measurement mode and connect the probes to the component's terminals. Check if the readings match the expected values. If not, the component may be defective and should be replaced.
Another useful testing procedure is to swap the suspected faulty component with a known working one. If the problem persists, the issue lies elsewhere in the circuit. However, if the problem disappears, the swapped component is likely faulty.
Incorrect Assembly
If you encounter issues with your DIY electronics kit, one potential cause to consider is incorrect assembly. Sometimes, the problem lies in the way the components are put together. Soldering errors, for example, can lead to poor connections or short circuits. It's important to ensure that all solder joints are clean and secure. Use a soldering iron with the correct temperature and size of the soldering tip to avoid overheating or damaging the components.
Another common issue with incorrect assembly is inadequate instructions. Clear and detailed instructions are crucial for successful assembly. Without them, it can be challenging to understand the correct placement and orientation of components, resulting in errors. If you encounter this problem, consider reaching out to the manufacturer for clarification or seeking guidance from online forums and communities.
Additionally, double-checking your work and comparing it to reference images can help identify any mistakes. Remember, attention to detail and precision are key when assembling your electronics kit.
Related posts:
 Common Mistakes to Avoid When Using DIY Electronics Kits
 DIY Electronics Kits Vs. Pre-Built Electronics: Which Is Better?
 Common Myths and Misconceptions About Smart Home Automation
 The Ultimate Guide to Building DIY Electronics Kits
 Most Popular DIY Electronics Kits for Hobbyists
 DIY Electronics Kits Vs. Pre-Assembled Products: Which Is Better?