
So, you've decided to embark on the exciting journey of programming with DIY electronics kits. Congratulations!
Now, before you jump headfirst into the world of resistors, capacitors, and microcontrollers, there are a few things you should know. Don't worry, this guide will provide you with all the essential information you need to get started.
From understanding the basics of DIY electronics kits to learning about the essential tools and programming languages, we've got you covered.
But that's not all – we'll also walk you through the process of building your first project and provide troubleshooting tips along the way.
So, grab your soldering iron and get ready to unleash your inner programmer!
Key Takeaways
- Understanding the components and principles of electrical circuits is essential for programming with DIY electronics kits.
- Having the right tools, such as a soldering iron, multimeter, and breadboard, is important for successful programming and prototyping.
- Choosing the right programming language, such as C++ or Python, depends on project requirements, hardware compatibility, and personal preferences.
- Building your first project with a DIY electronics kit requires understanding basic components, selecting a suitable project, gathering necessary components, and following instructions while learning from mistakes.
Understanding DIY Electronics Kits
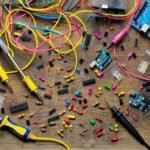
To understand DIY Electronics Kits, you must familiarize yourself with the components and principles of electrical circuits. These kits are designed to provide beginners with a hands-on experience in building and experimenting with various electronic devices.
One of the first things you'll encounter in these kits are the basic circuitry components, such as resistors, capacitors, and transistors. These components are essential for creating and controlling the flow of electricity within a circuit. They allow you to build simple circuits and understand how different elements interact with each other.
Exploring different DIY electronics projects for beginners is another important aspect of understanding these kits. These projects serve as practical applications of the components and principles you have learned.
For example, you might start by building a simple LED circuit or a basic sensor circuit. As you gain more confidence, you can move on to more complex projects like building a small robot or a digital thermometer. The goal is to gradually expand your knowledge and skills in electronics while having fun and enjoying the freedom to create and experiment.
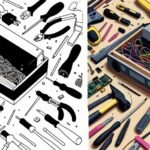
Essential Tools for Programming With DIY Kits
Now let's explore the essential tools you'll need to program with DIY electronics kits, allowing you to further expand your knowledge and skills in the field of electronics.
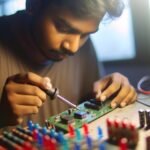
As a beginner, it's important to have the right tools at your disposal to effectively program DIY kits. One of the most crucial tools is a good quality soldering iron. This will enable you to connect components and create circuits, ensuring a solid and reliable connection.
Additionally, a multimeter is essential for measuring voltage, current, and resistance in your circuits. It helps you troubleshoot and identify any potential issues.
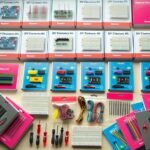
Another important tool is a breadboard, which allows you to quickly prototype and test your circuits without the need for soldering. It provides flexibility and freedom to experiment with different configurations.
Furthermore, a set of screwdrivers, pliers, and wire cutters are invaluable for handling components and wires.
Lastly, a computer with programming software is essential for writing and uploading code to your DIY kits. Learning programming techniques will enable you to control and interact with your electronic projects.
Programming Languages for DIY Electronics Kits
Choosing the right programming language is crucial when working with DIY electronics kits, as it determines how you'll communicate and control your electronic projects. Here are three important considerations to help you make the best choice for your DIY electronics endeavors:
- Best practices for programming in C++ with DIY electronics kits: C++ is a powerful and versatile programming language widely used in the DIY electronics community. It offers low-level control and efficient memory management, making it ideal for resource-constrained devices. To make the most of C++ with DIY electronics kits, follow best practices such as using object-oriented programming principles, modularizing your code, and utilizing libraries and frameworks specific to your kit.
- Exploring Python as a programming language for DIY electronics projects: Python is a beginner-friendly, high-level programming language that has gained popularity among DIY enthusiasts. Its simplicity and readability make it easy to learn, and its extensive libraries and frameworks provide a wide range of functionalities for DIY electronics projects. Python is particularly suitable for rapid prototyping and scripting tasks, allowing you to quickly iterate and experiment with your projects.
- Consider the specific requirements of your DIY electronics projects: When selecting a programming language, consider the specific needs of your projects. Factors such as hardware compatibility, available libraries and resources, community support, and personal preferences should all be taken into account. Ultimately, the goal is to choose a programming language that empowers you to freely express your ideas and effectively control your DIY electronics projects.
Building Your First Project With a DIY Electronics Kit
You can begin your journey into building your first project with a DIY electronics kit by understanding the basic components and their functions. This knowledge will help you choose the right components for your project and ensure its success.
When exploring different project ideas, it's important to consider your interests and goals. Do you want to build a simple LED circuit, or are you interested in more complex projects like a robot or a weather station?
Once you have chosen a project, gather all the necessary components from your DIY electronics kit. This may include resistors, capacitors, transistors, LEDs, and a breadboard for prototyping. Make sure you have the correct tools, such as a soldering iron and wire cutters, to assemble your project.
Follow the detailed instructions provided with your kit, and don't be afraid to experiment and learn from your mistakes. Building your first project with a DIY electronics kit is an exciting and rewarding experience that will help you develop valuable skills in electronics and programming.
Troubleshooting Tips for DIY Electronics Programming
To effectively troubleshoot DIY electronics programming, it's essential to employ systematic debugging techniques and analyze potential issues in a methodical manner. Here are three key tips to help you overcome common programming errors and successfully debug your DIY electronics projects:
- Check your connections: Ensure that all components are properly connected, and double-check the wiring against the schematic or circuit diagram. Loose or incorrect connections can lead to unexpected behavior or errors in your program.
- Use serial debugging: Serial debugging is a powerful technique that allows you to monitor the execution of your program by sending debug messages over a serial connection. By printing relevant information at critical points in your code, you can gain insights into the flow of your program and identify potential issues.
- Divide and conquer: When faced with a complex program, break it down into smaller parts and test each component separately. This approach helps isolate the source of the problem and makes it easier to identify and fix any errors.
Related posts:
 How to Build a DIY Electronics Kit for Beginners
 How to Choose the Best DIY Electronics Kit for Beginners
 The Ultimate Guide to Building DIY Electronics Kits
 Beginner's Guide to Building Circuits With DIY Electronics Kits
 DIY Electronics Kits Vs. Pre-Built Electronics: Which Is Better?
 Best Ways to Learn Electronics Through DIY Kits